Archive for the ‘Software and Technical’ Category
How to add Videos to your EZCapper website in 15 minutes or less!
-
- Youtube Code
-
- html_editor
-
- pasted_code
-
- finished_done
-
- Accessing the HTML Editor
Click the above images to see in full size view.
Adding videos to your website is a very compelling marketing mechanism. Having clients see you in person creates a physical presence that conveys trust. In my 10 years of marketing experience the one thing I can not underestimate is the value of videos in your website in generating credibility. In particular testimonials from 3rd parties are a killer when it comes to helping convert customers.
Let’s go through the basic steps:
- Figure out what type of content you are going to put on your site. If you only want to make one video, make one introducing yourself and explain why customers should buy your service. I do recommend that you make at least one video per week summarizing the previous week’s results.Having a real person communicate using a video in the About Us section of the website is invaluable to creating that necessary trust bond with your customers. Make sure to apply the KISS rule – Keep it short and simple! Make sure that you convey your points concisely and that the video lasts no more than 5 minutes!
- Learn how to make a video and upload it on Youtube. Adding a video on youtube is a form of promotion that will bring links back to your website. In the video description make sure you put the link in the title or the video description in addition to a proper description. People who are curious will dig deeper and look for the URL to find out more information. All you need is a cheap PC web camera that can be bought for $25. Quality is not the issue when making videos as customers will accept lower than HD quality videos. Some key points:
- Watch how to make a video here : http://www.youtube.com/watch?v=exFI7NlFqNc . This series of videos is very useful and shows you the basics of making a video. You can also make videos with your cellphones and handheld video camera (preferably digital).
- Create an account on Youtube with your site’s name as the username. For example if your site name is “ABCCapper.com” then create a youtube username of “ABCCapper.com” or something similar so people can find you.
- Promote your URL (ABCCapper.com) at every instance so people will copy and paste the link into their browser to visit your site.
- See some sample videos from handicappers here:
- http://www.youtube.com/watch?v=L4ItE2o1GBc
- http://www.youtube.com/watch?v=fkNpfMWHRgI
- http://www.youtube.com/watch?v=-xVUOR26G18
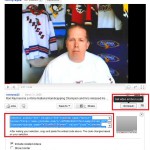
- After you upload the video on youtube it will appear like this (see and click image “Youtube Code”). You will now take this video and put it on your EZCapper page:
- Click on the <Embed> button and a box will show some code (I’ve put a box around it in RED in the Youtube Code image at the top of this article). Copy this code and paste it into your HTML editor.
- Access the page you want to put the video in your EZCapper website’s admin control panel.
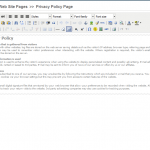
- Click on the HTML button on the page to access the HTML editor. (see html_editor image)
- Copy the code from Youtube and paste it into the page.
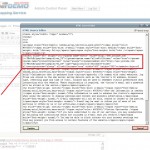
- Once you have copied the code into the appropriate part of your code (see image pasted_code), save the page by selecting “Edit Page”
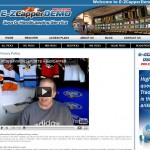
- Voila, you are now done! View the page (finished_done image) and see your video in action.
- To remove the video just simply delete the code you added.
Check out this video by one of our clients: http://pappysportspicks.com/
Other tips:
- Adding videos requires NO knowledge of HTML or anything. However if you need to know some basics of HTML check out this handy reference: http://www.w3schools.com/html/html_primary.asp
- Each video has a link to it. Copy this link and paste it in cappers or other sports forums. People will click on a video link with greater frequency than a link to a text page. Conversion rates with videos are also far higher.
Setting up Your Godaddy Webmail to work on your own email client such as Outlook
Many of our clients using GoDaddy’s webmail system to manage their emails. If you wish to setup your own email client (e.g. Outlook, Google Apps, Outlook express) refer to the following article:
Instant Messaging Add-on
We’re finding out that more and more people are using instant messaging (a.k.a. IM) as their preferred method of contact. After implementing IM on our EZCapper site http://www.ezcapper.com/contactUs.asp we’ve gotten new clients with little effort. There are many instant messaging tools available on the internet for free. Once you have the code for the chatbox please advise us and we’ll implement it on your site.
Hosting your own Images and using the HTML Editor
 I get a lot of questions asking how to add an image to the body content. The first thing you must know is that to do this you must access the html editor. You access it by clicking on the HTML button (click on the image below). In the html code you must link the image you want to where you are hosting it. There are plenty of places which do free image hosting. A quick search on Google shows the following services that host images for free:
- http://imageshack.us/
- http://tinypic.com/
Step 1. Once you upload your image to these services you will obtain a URL where you will use in your HTML code. Once you reference this image in the html code via your html editor, your body text will show the image.
There are two options to get this image into your page:
Basic Users: Use the Image Editor
- Step 2 – Select the Insert Image button and paste the url from Step 1 into the Image URL box. The other two boxes are optional. After inserting it, save the page and the image should show.


Adding a link
- If you want to add a hyperlink to the image simply select the image link button and it copy and paste the URL (e.g. http://www.google.com) to the page you want to link to.

Advanced users: Use the HTML Editor
- Step 2. Take the url of the image and insert it into the HTML Code. If you don’t know HTML you can browse the net for more details. It’s very easy to use and many programs like Microsoft Word will automatically convert it for you. For a very basic primer refer to: http://www.w3.org/MarkUp/Guide/

Slow Site Response ? Read this first!
I get a lot of emails from customers who tell me that their site is slow or that they can’t access the site. Our servers are hosted at a state of the art data center and the server is very rarely down. If we need to reboot the server we typically do it in the middle of the night and it takes no more than 5 minutes. We also continually optimize the server and upgrade it so our customers get the best performance available. My answer then is that the issue is rarely from our end.
Out of 10 customers who complain nearly 10 always come back and tell me that the issue was on their side. Either because of their computer or their own network connectivity. When reporting a slow site response please send in a screen shot of these two tests:
- Speedtest – http://www.speedtest.net/results.php – This will tell you the speed of your network connection.
- Traceroute – http://network-tools.com/– Type your website name (e.g. www.ezcapper.com) in the submit box and press GO. Also select TRACE as the option in the above section . On the next page you will get the Traceroute results. Please copy and paste that and send it back to us.
Timeout issue when editing pages in the Control Panel
I’ve had a lot of inquiries regarding the timeout issue when logged in to the control panel. Some users have experienced a timeout issue where upon submission of the page, it returns back to the login box without any page modifications being changed in the system.
Microsoft ASP technology which is the computer language we use on EzCapper, has an inherent security protocol which requires the user to logout if the site is inactive for a period of time. This timeout setting can be increased but cannot be eliminated. If you wish to increase this send us an email and we’ll increase the timeout setting for your site.
A workaround to this issue is this: To keep the current session active, open another window with the main control panel showing and refresh the page in your browser approximately every 5 minutes. This alerts the system that the user is still active and renews the session so it is not reset.
How to create your own website design
We have clients that wish to setup their own website. In order to this you need to change a set of 8 files. For the purposes of this example, I will reference the demo site system that can be found here http://demo.ezcapper.com/

The header.jpg file is 900×165 pixels and this is the main banner on the home page.
The header consists of two files wit the second file being headerBack2.jpg (900×46 pixels). This file is a tricky file as it connects the header to the menu system. More….
The second set of files comes as (notice they are all .gif files)
menu_hover_right.gif (250×46)
menu_hover_left.gif (19×46)
menu_bg.gif (2×46)
These files make up the hover menus when you put your mouse over the main menu ( “Home”, “Register”, “Access Plans”, etc. ).
The next set of files:
logo.jpg (330×95)
miniLogo.jpg (140×80)
are referenced at the following pages:
- header image of http://demo.ezcapper.com/admincontrolpanel
- right column image at http://demo.ezcapper.com/
The last image barBackground.jpg (5×22) is the color bar reference used in the “Member Login” background.
Please note the following:
- The 3 files in the hover menu set can be designed as a solid color or a semi-transparent image by making some adjustments.
- The images must be in EXACTLY the same pixel size and format (jpg or gif) in order for us to bring it to the system.
- The header set of 2 files must align exactly particularly when using an image.
- Access your admin settings and adjust the other colors in the “Edit Website Info / Settings” button.
Below I’ve attached the list of files for reference for the demo site. Click on the files twice to download.


How to keep users on your website and ensure they keep coming back!
The way to keep people on your site is to put relevant and “sticky” content on your website. What exactly is sticky content? Sticky content is content that keeps users engaged on the website and keeps them coming back on a regular basis. Keeping users coming back to your site means more sales!
At EZCapper we’ve come up with three new features.
1. Play for fun sportsbook with live betting lines
2. Live Dealer Casino with real dealers (gorgeous and sexy!)
3. Player to Player Poker coming soon!
To see how this works take a look at http://www.atsinsider.biz/ , from here click on either the Sportsbook or Live Dealer Tabs. To see the live dealer in action contact us for the passwords.
Then click on Live Games. Select your game and have some fun. This live-dealer product we are offering is totally amazing and keeps users on the site for hours.
Inquire with us on how you can get setup with these amazing add-ons.
What is considered billable service work?
What is considered billable service work?
We often get customers that are confused between what is a billable charge and what isn’t. As an ASP (application service provider) we provide all support including server hosting and application support. There are huge advantages between a hosted service (one famous example is Google Apps and in particular Gmail) which we are providing and doing it yourself (eg. running Microsoft Exchange which is the same as operating your own email servers) which can consume all your time. Our standard system is a template system where all settings are pre-configured. Anything beyond our standard configuration is considered a custom site which is billed at a different rate. Our standard system is defined by those links to the two demo systems from our website.
Here’s what is included and is covered by your monthly fees:
- Any server related issue, we are responsible for.
- Any minor modifications (eg. changing the email address notifications, updating any software settings not accessible from the administrator control panel).
Here’s what is included in your one-time setup fees ($50):
- We cover a basic non-elaborate header design (see our demo) as part of the initial setup fee. Any designs that are more elaborate than that indicated in the demo can be done by a 3rd party designer which we outsource to at $25 per hour. Clients also have the option to provide their own designs if they choose to do so.
- Configuration of the website system and testing.
What we charge for (one-time fee):
- Transfer of content from an existing website to a new EZCapper website.
- Adding new pages to the website beyond the template pages ($20/page or $25 per hour whichever is greater).
- Changing the header designs (based on designer’s cost of $25 per hour).
- Modifying any colors adjustments that the user can do themselves in the backend.
- Writing and formatting content that the user can do on their own.
- Modifying metatags for SEO purposes.
What we do NOT support
- Content that you input on your backend administration including formatting.
- Payment integration on behalf of the client (this can be easily done by the client, click here for details)
- Custom access to any folder. As we are a template based system we do not provide access to our source code for security reasons.
- FTP Access to any website.
- Hosting of banner ads or images. This can be done by the client, click here for details.
Questions? Please comment on the blog.
Welcome to our New Blog
This blog is to keep our customers apprised on all our developments. As a full-service company we provide complete solutions to help our customers earn more money. Subscribe to our RSS Feed by adding us to Google Reader or other RSS reading tool.
Contact us if you have any questions on any of our services. We can be reached at your convenience.